Member Directory
The Member Directory lists the people and families in your church. Use it to look someone up, see their contact details, and print or download the directory. With Edit access you also add and update profiles here.
Where: In the menu, click Church Membership, then Member Directory.
Who can use this: You need View or Edit access to Member Directory, set in Role Management. View access lets you search, open profiles, and print or download. Edit access adds the Add Members button, the pencil and trash icons, and the Member Roles filter.
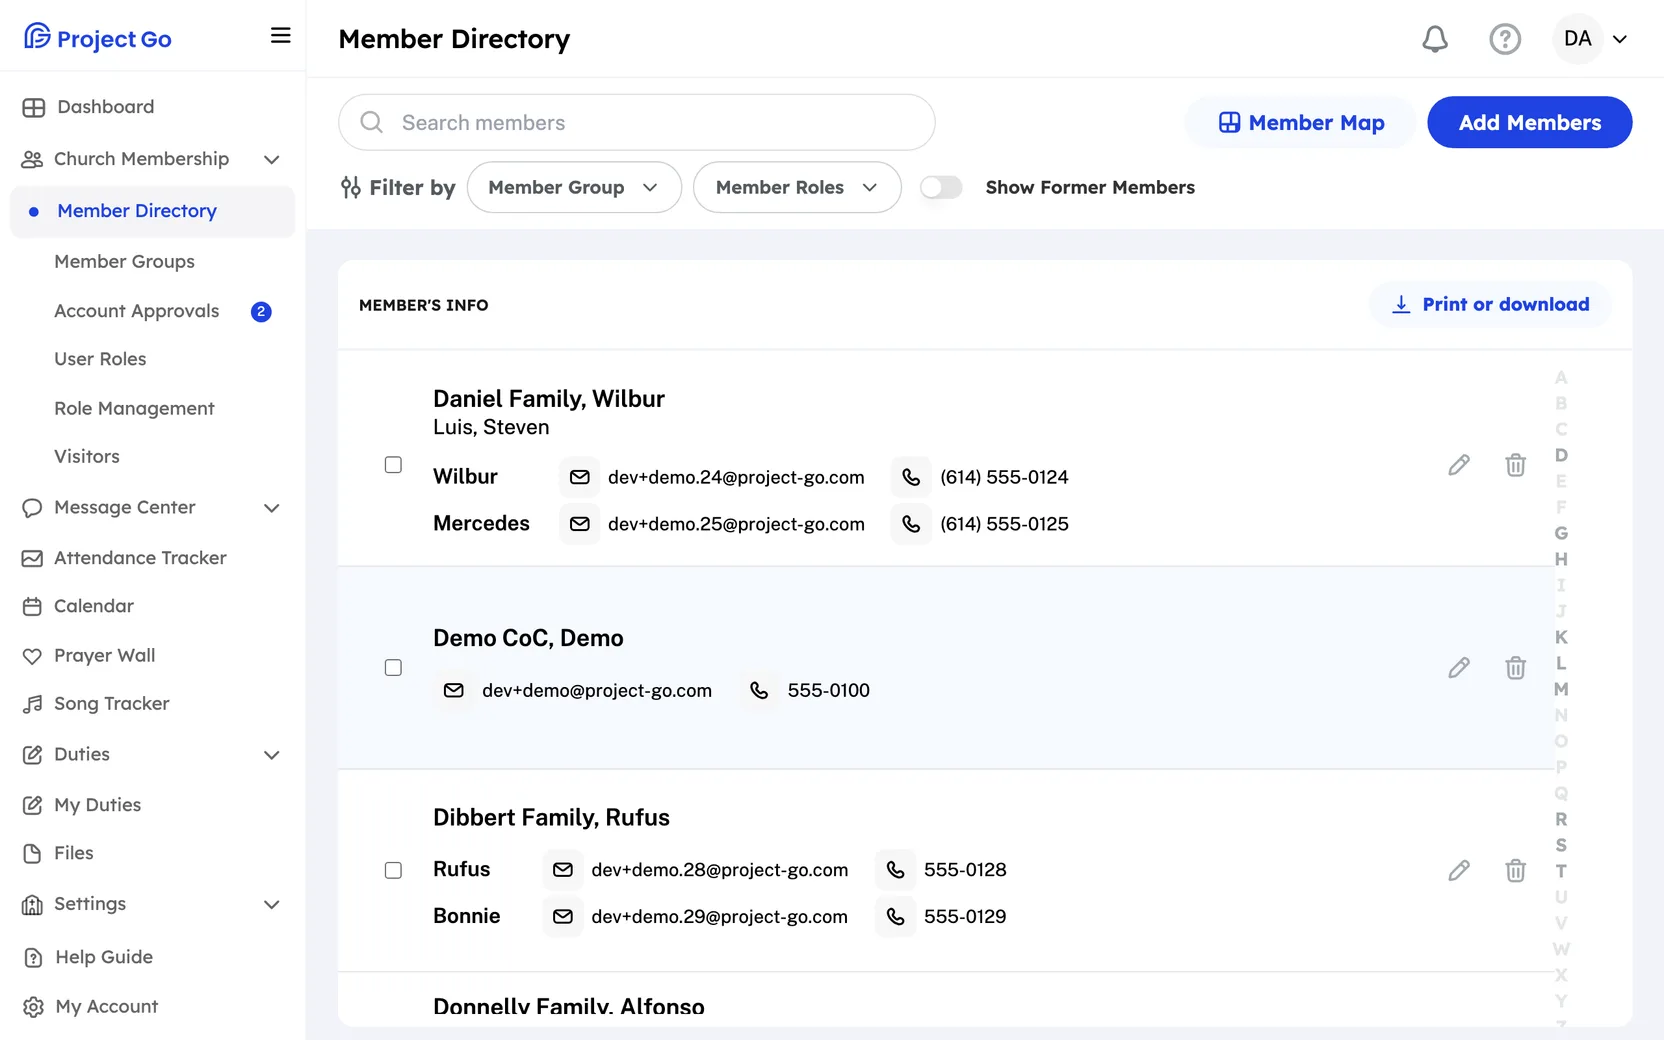
Find a member
- At the top, click Search members.
- Type part of a first name, last name or family name.
The list changes as you type. On a computer you can also click a letter on the right side to jump to that part of the list.
Filter the list
- Click Member Group and check one or more groups to see only their members. You need access to Member Groups to see this filter.
- Click Member Roles and check one or more roles. This filter needs Edit access.
- Turn on Show Former Members to add former members to the list. They show with a Former Member label.
Each group or role you pick shows as a small tag under the filters. Click the X on a tag to remove it.
See a member's profile
- Click the person or family in the list.
- Read the Member Profile window.
- For a family, click a name on the left to see that person. A star (*) marks the husband and the wife.
- Click the photo to see it larger.
A profile can show the address, birthday, anniversary, baptism, email, phone, school, work, groups, social media links, previous churches and comments. Only the details that were filled in appear.
Copy an email address or call a member
- Click an email address to copy it. You see Email copied to clipboard.
- Click a phone number, then click Call this number or Copy to Clipboard.
See a member on a map
- Open the member's profile.
- Next to the address, click View in Map.
- Click View in Member Map, Directions in Google Maps or Directions in Apple Maps.
On a computer you can also click Member Map at the top of the directory. Each profile has a switch, Show your household on the church map, which is off until someone turns it on.
Print or download the directory
This is available on a computer, not on a phone.
- To include only some families, check the box at the left of each of their rows first.
- Above the list, click Print or download.
- Under 1. What do you need?, choose a file type and its options.
- Under 2. Who should be included?, choose Everyone or Only the families I selected.
- If you want them, check Include former members.
- Click the download button at the bottom right.
| Choice | What you get |
|---|---|
| Printed directory | A PDF with one entry for each family. Choose Full or Compact. |
| Birthday list | A PDF of birthdays, month by month |
| Anniversary list | A PDF of wedding anniversaries, month by month |
| Spreadsheet | An Excel or CSV file with one row for each person |
| Phone contacts | A vCard file (.vcf) that adds each person to a phone's contacts |
- Everyone means the whole directory, even if the list on screen is filtered.
- The printed directory has check boxes for Photos, Birthdays, Anniversaries, Comments, Star (*) for baptized members, Large text, and Children's phone, email and birth year.
Add a member
- In the top right, click Add Members.
- Type the First Name: and Last Name:.
- Choose the Gender:.
- Fill in any other details you have, such as Birthday:, Address:, Email: and Phone:.
- In the top right of the form, click Save.
- First name, last name and gender are required.
- For the address, start typing and pick the address from the list. If it is not in the list, click Add Address Manually and type it in. An address typed by hand does not show on the Member Map.
- A phone number must have 10 digits.
- Profile pictures must be PNG or JPG and 2MB or smaller.
Add a family member
- Add the first person as shown above, or click the pencil icon on a row in the directory.
- On the left, click Add family member.
- Type the first and last name.
- In Family Relationship:, choose Husband, Wife, Son or Daughter.
- Choose the Gender: and fill in any other details.
- Click Save.
When a household has more than one person, a family entry appears at the top of the list on the left. Click it to set the Family Name:, family photo, address, Anniversary:, Previous church: and comments.
Change a profile
- In the directory, find the person or family.
- On the right of the row, click the pencil icon.
- On the left, click the person or the family entry.
- Make your changes.
- Click Save.
If you leave without saving, you see Are you sure you want to cancel? Click No, Go Back to keep your changes.
Hide a birth year or anniversary year
- In a person's profile, under Birthday:, turn on Hide Birth Year.
- In the family entry, under Anniversary:, turn on Hide Year.
Others then see the month and day only.
Record membership, hobbies and family relations
- In a saved person's profile, turn on Member of this church:. Then pick a date under Member since:. You see these two fields only with Edit access to the Member Directory.
- In a person's profile, type in Hobbies:.
- In the family entry, type in Family relations:. Use it for relatives who also attend.
Send a login email
This sends the member an email with a secure link to create a password and sign in.
- Open the saved profile with the pencil icon.
- Make sure the Email: field is filled in and saved.
- Under Send Login Email, click Send.
You see Email sent. The Send button is off until the profile has an email address.
Add a member to a group or remove them
- Open the saved profile with the pencil icon.
- Under Your Groups, click Add group.
- Click the group.
To remove the member from a group, click the X on the group's tag. Add group shows only if you have Edit access to Member Groups.
Mark someone as a former member or as deceased
- Open the profile with the pencil icon.
- At the top of the form, turn off Current Member, or turn on Deceased.
- Click Save.
To mark a whole family as former members, click the small person icon next to the family on the left, then click Mark as Former. Click the same icon later and choose Restore to undo it.
Delete a member or a family
- A whole household: In the directory, click the trash icon on the row, then click Yes, delete. This removes everyone in that row.
- One person in a family: Click the pencil icon on the row. On the left, click the trash icon next to the person, then click Yes, delete.
Note: The confirmation says the action is permanent and cannot be undone. A person who is the only family owner in a family of two or more has no trash icon.
Move a person to another family or to their own profile
These buttons are at the bottom of a person's profile form. If you do not see them, your account cannot move people.
- Transfer to Another Family: search for the family, click it, then click Transfer.
- Make Profile Independent: click Yes, separate. The person gets their own profile. This cannot be undone.
If the person is the last family owner of the family, you must first choose a new one under Select new family owner.
On a phone
- In the bottom bar, click Directory.
- The list has letter headings. There is no A to Z strip on the right.
- The filters are behind the funnel icon next to the search field. Add Members shows as a plus icon.
- Print or download, the Member Map button, and the row check boxes do not show. To reach the map, open a profile, click View in Map, then View in Member Map.
- In a family's profile, the names are in a dropdown at the top.
If something goes wrong
- First name must contain at least 2 character(s): names need two letters or more. Last names have the same rule.
- Please select a gender or Please select a family relationship: choose a value in that field.
- Start typing your address and select an option from the dropdown. Pick the address from the list, or click Add Address Manually.
- Phone number must be exactly 10 digits: fix the phone number.
- Please upload a file smaller than 2MB. or Please upload a file of type: png or jpg.: use a different picture.
- We could not make your file. Please try again. If a printed directory fails twice, turn off Photos.
- No one is in this choice. Change who to include. Choose Everyone, or check Include former members.